Help with Tool Changer Program

cartierusm

Member
Join Date
Oct 2016
Location
San Francisco
Posts
25
I'm trying to control a tool changer on my retrofit CNC lathe that I built. I have experience with PLCs, but not much. I'm using a click PLC.

The tool changer has 5 proximity switches, NPN, and a combination of 3 of those switches ON is a position.

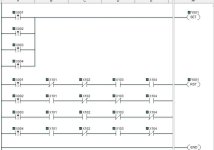
Look at the pics. When I write a program for a single position, such as the first pic, it works of course, but I can't figure out how to program it so I can press a different button to have it stop on different positions.

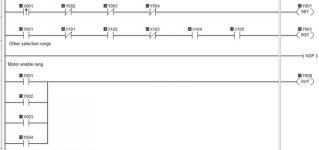
The second pic show basically what I want to happen. Any help would be appreciated.

example1.jpg example2.jpg
 
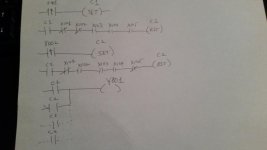
You're close...your first pic is what you want but instead of set/rst the output set/rst a memory bit that represents go to position 1. Then make two more exactly like the first two rungs but set/rst a memory 2 bit and a memory 3 bit. Then use those three memory bits in parallel to turn on your output with an OTE not a set.
 
I would:
  • have each X00n transitional drive its own separate Y00n latch
  • include in the latch (set) rungs the OFF state of the remaining Y00n outputs ( Y001 can only be set if 2,3 and 4 are OFF, and so on)
  • parallel all the Y00n outputs to drive one Y motor enable
  • use the Y00n to enable the logic for the prox switches
YMMV
 
I don't know Click well enough to know the internal memory tags, but this should be what you need.

EDIT: Doug posted as I did, but same thing...his rungs have interlocks in the PB rung in case any other mode is active, which I don't know from limited information if you need. Also don't know if you have any STOP PB's, but those would be put in parallel with all the RST rungs.

20170212_175058.jpg
 
Awesome, thanks gentleman! I'll give that a whirl and see if it works. I'll also study it to understand what it all means so I know for next time. I've done latches before with help from others on here, but don't quite grasps how they work yet. I think I need a real work example, a physical example of how they work.
 
Thanks Chaps, works a treat.

Now if i can figure out how to get it to stop at the correct position. It's over running by a little bit.

Is there a way to have the click plc react faster? I know you can change scan speed, would that help?
 
I doubt PLC scantime is your problem. More likely it's physical/mechanical. Relays have to switch, solenoids have to physically travel, everything has momentum and inertia...I mean, without checking out your system I can't say for certain that PLC scantime is your problem, but I highly doubt it.
 
True, but this is the original setup and the old electronics did the job, and they were from 1978.

After I wrote this I realized that it probably was mechanical. I then figured that the original motor, which I'm using, probably was hooked up to a VFD of sorts and that would stop it instantly. I think what's happening is it's coasting a little after it shuts off. I've got a VFD so I'll try that.
 
BOOYA!! It's working. Thanks for the help. I hooked up the VFD and exactly what I thought. It's working perfect now. Now I just have to interface it with my CNC program. Which I have no clue of. Off to another forum.
 

Similar Topics

I APPRECIATE ALL HELP!👼 I am trying to set up a tool changer on a lathe. Disclaimer :): I have never used a PLC or the software to...
Replies
34
Views
16,852
Hello Team, I am desperate for some help with an assessment I have as part of a Level 3 general engineering course. I am in a role that is much...
Replies
9
Views
338
Hi, I have a new PanelView Plus 1000 that I am using to replace an old Panelview Plus (pre v6, I'm not sure exactly what version). I have a clone...
Replies
4
Views
2,776
i finished a new project by protool v.6 sp3 on win xp , i have S5 TTY Programming Cable when i connect to op 15 display transfer ready but when...
Replies
0
Views
1,274
This is a different problem but on the same machine as my other post. Basically there is an alarm message showing up on the TP270 HMI, and I am...
Replies
6
Views
6,617
Back
Top Bottom