Connectivity between MicroLogix 1000 and PanelView C600

SergioB

Member
Join Date
Dec 2011
Location
Chicago
Posts
119
I'm working on interfacing a MicroLogix 1000 and a PanelView C600.

I've scoured the internet trying to find specific examples or tutorials without success. I've tried a combination of settings found scattered in various documents/newsgroups/articles, etc, but still not able to make it work.

So, here's what I've done. I've used the KISS approach to just have the PV (when ON button is pushed of course) set the true bit on an input contact in a basic ladder program. I've included all the relevant screenshots below.

Hardware used:
  • MicroLogix 1000
    Model: 1761-L32BWA, Ser E, FRN 1.0
  • PanelView C600
    Model: Cat 2711C-T6C, Ser B, Rev C
    Firmware Version: 01.50.000
  • Communication cable 1761-CBL-AP00, Ser C, AIC TO PC COMMS CABLE

Assumptions:
  1. Pushing a button with associated boolean tag on the PV program will set the true bit in associated contact in the ML program, as if push-button had been pressed.
  2. Peer-to-peer is possible using single cable between ML and PV.
  3. Just connecting comm cable between PV and ML (in Run mode) and restarting both devices will establish connection between the two.

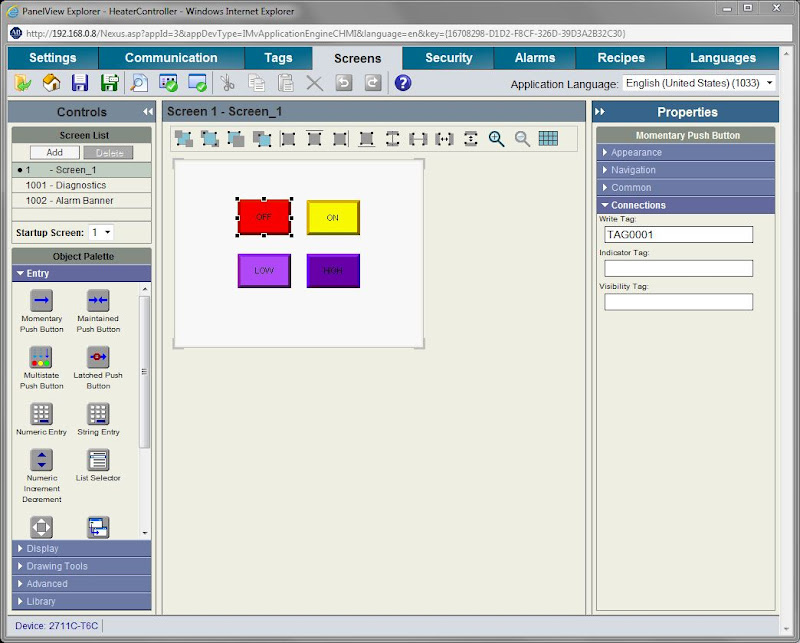
The screen has just 4 buttons (let's ignore the bottom 2 for now), with the first top 2 supposedly setting the bits on those referenced inputs (OFF button Write Tag = "TAG0001" while ON button Write Tag = "TAG0002"):

PanelView_C600_Screen_1.JPG


These are the Tags that reference the inputs:

PanelView_C600_Tags.JPG


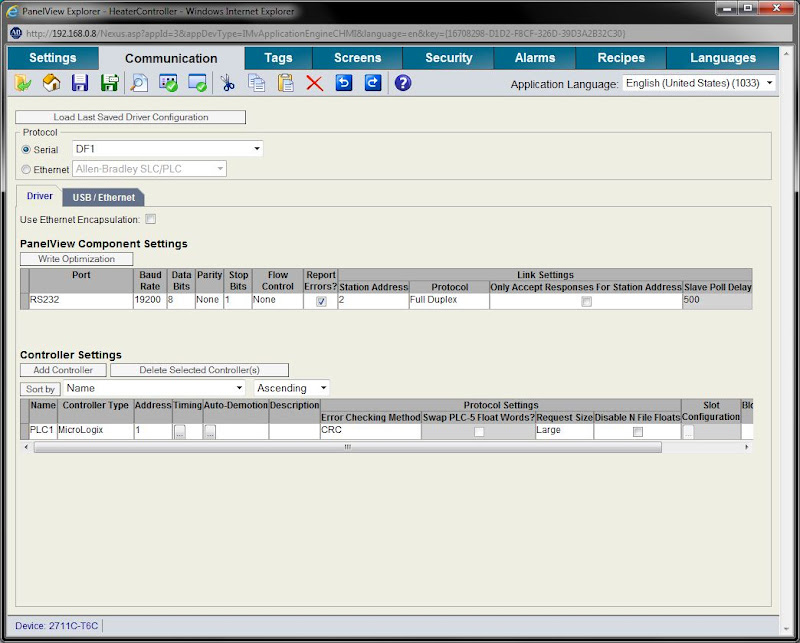
Here are the PV app communication settings:

PanelView_C600_Communication.JPG


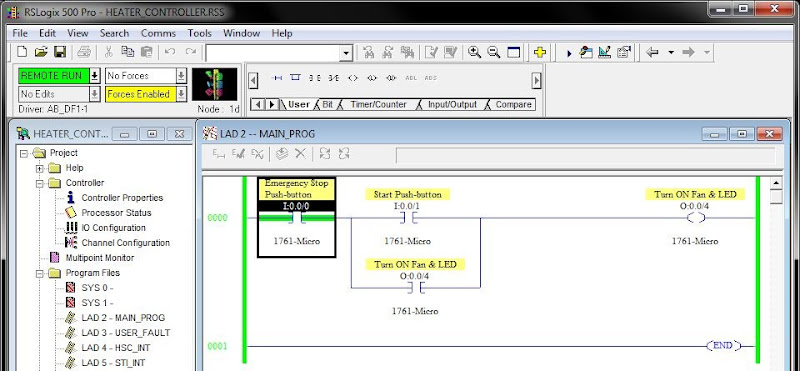
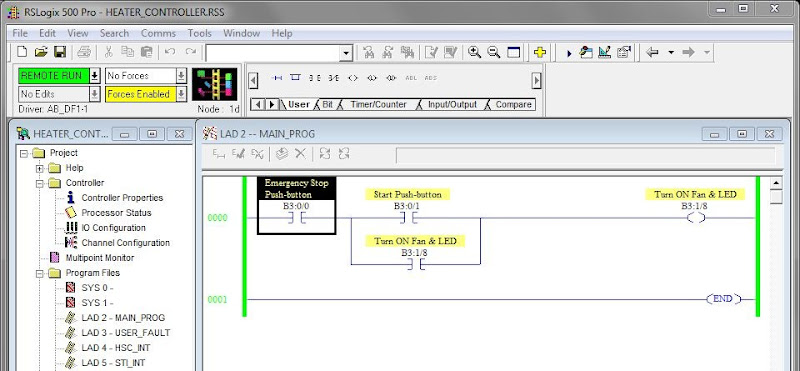
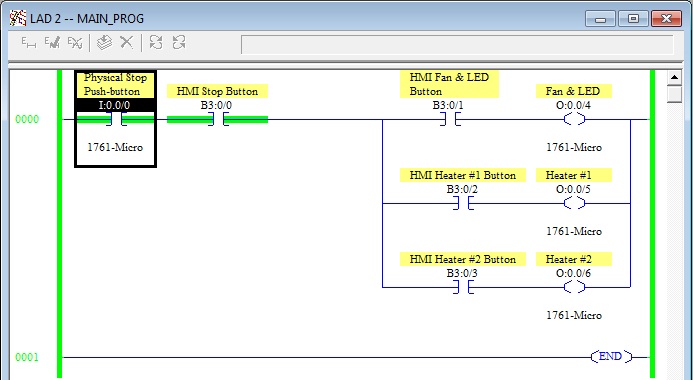
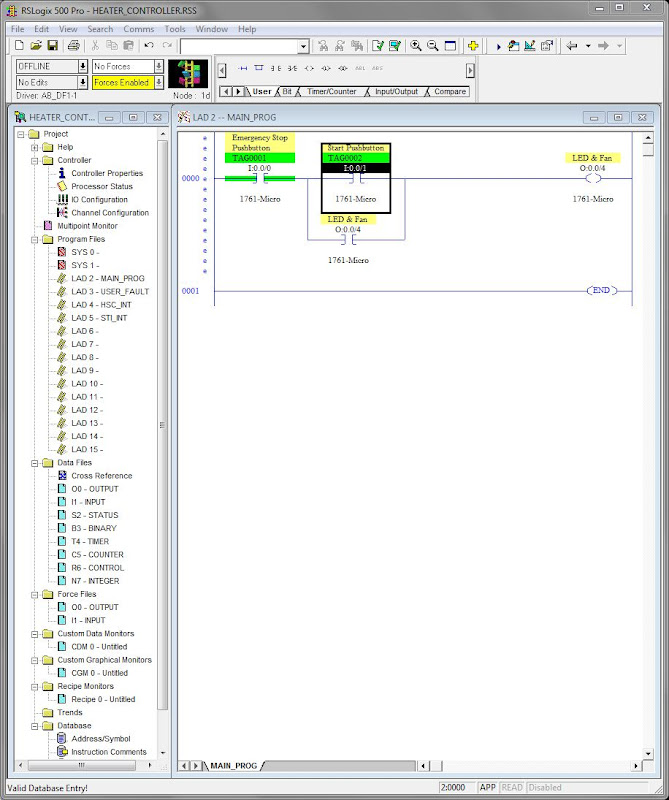
Here's a basic ladder program that just turns an output. Note that the inputs have the symbol set to match those PV tags:

PanelView_C600_LAD_2.JPG


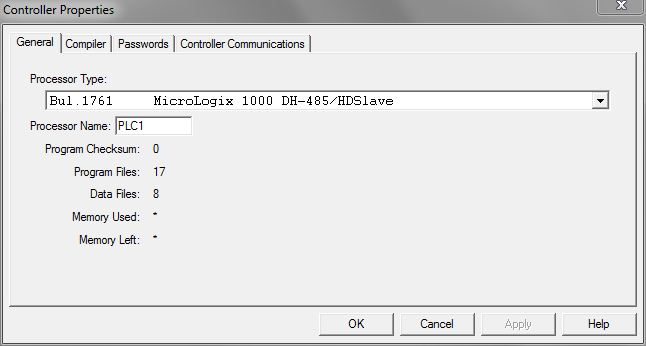
These are the Controller properties that match the name referenced in the PV tags:

PanelView_C600_Controller_Properties.JPG


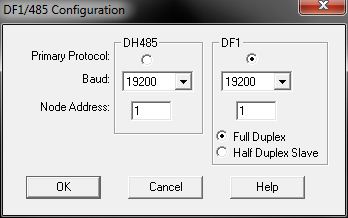
And finally, here are the Channel Configuration settings:

PanelView_C600_Channel_Configuration.JPG


If you could point me in the right direction, I would greatly appreciate it!!!

Thanks in advance,
sb
 
As Phil is about to turn off for Maintenance a quick ans
Change the I: Tags and the O: tags to B3:Tags

The I: and the O: are designated as the ML1000 only, real world Inputs and Outputs
 
Last edited:
The input data file is constantly updated with the value of the physical Input points.

You can write to a memory address like "I:0.0/1" but it's going to be written over by the actual state of the input point a few milliseconds later.

Substitute an unused Binary data table element like "B3:0/1" for your Start pushbutton (and for your Stop pushbutton, etc) in both the ladder logic and the PanelView Component configuration.
 
Ok, I will give that a shot.

PS: As much as I'd like to work on this, gf's here and wants my full attention. Will probably have to wait until Monday because of New Year's eve celebration and whatnot. Bumber!

Will try to sneak in some time here and there during the weekend.


Thanks a lot!
sb
 
Last edited:
As Phil is about to turn off for Maintenance a quick ans
Change the I: Tags and the O: tags to B3:Tags

The I: and the O: are designated as the ML1000 only, real world Inputs and Outputs

The input data file is constantly updated with the value of the physical Input points.

You can write to a memory address like "I:0.0/1" but it's going to be written over by the actual state of the input point a few milliseconds later.

Substitute an unused Binary data table element like "B3:0/1" for your Start pushbutton (and for your Stop pushbutton, etc) in both the ladder logic and the PanelView Component configuration.

Hi Gil47 and Ken Roach;

Thanks for the suggestion, it makes sense!

I read that B3 tags store the status of the internal coils and contacts. However, when I replace the contact addresses in the ladder program from I:0/1 to B3:0/1, for instance, the start button won't respond when pushed. Do I need to do something else beside just replacing I/O tags to B3 tags?

An interesting thing is that both input leds on ML lit up correctly, but RSLogix won't respond to that input, in other words, the contacts in the software don't lit-up (turn green when physical contacts closed) on the screen, hence not switching output ON.

Thanks,
sb
 
Last edited:
SergioB said:
Hi Gil47 and Ken Roach;

Thanks for the suggestion, it makes sense!

I read that B3 tags store the status of the internal coils and contacts. However, when I replace the contact addresses in the ladder program from I:0/1 to B3:0/1, for instance, the start button won't respond when pushed. Do I need to do something else beside just replacing I/O tags to B3 tags?

Yes, you need to assign that address to your HMI tag as well.

Another issue is the update rate of the HMI with respect to the Micrologix. You may need to program the HMI to hold the momentary start (and stop) button on for a certain amount of time (500ms typical). This is helpful to ensure that it is detected for sure by the next PLC communication cycle. How to achieve this can vary from one HMI to the next and I have no experience with the Panelview Component series.

If someone touches the button for say 0.1 seconds (100ms) and the Panelview adds the 'write a 1 to b3/0' command to its list of things to do, then the actual communication takes place sometime later, by then the 'write a 0 to b3/0' command is queued up (because the operator is in a hurry and has already "let go" of the touch cell), the transition from 0 to 1 may be missed by the PLC.

Things like Jog buttons, however, don't always call for this delay, because in most cases, you want the motor to turn off as soon as possible after the operator lets go of the button in order to behave (as close as possible) responsively like a real hard wired jog button.
SergioB said:
An interesting thing is that both input leds on ML lit up correctly, but RSLogix won't respond to that input, in other words, the contacts in the software don't lit-up (turn green when physical contacts closed) on the screen, hence not switching output ON.

Thanks,
sb
Remember that if you see a light on the Micrologix, there's a 99.99% chance that the PLC really did see it too, however, there are asynchronous communications between that PLC and RSLogix, and more importantly, delays between RSLogix and windows repainting the screen.
 
Last edited:
Yes, you need to assign that address to your HMI tag as well.

I'm sorry, I should've been more specific. Whenever I make changes to the ladder logic, I always make sure that the hardware buttons work first before trying to get the HMI to work.

In this case, for example, the real-world NC Stop push-button is physically connected to I:0/0 while the NO start push-button is connected to I:0/1. When running program remotely, the stop button is lit up in the software as it should be (being an NC push-button), while the start button lits up in the software only when pushed.

Now, when changing the addresses of the input buttons in the software to B3-style addresses, the contacts don't lit-up as before when pushing the physical push-buttons.

Using normal I/O addressing:
Before%252520changing%252520to%252520B3-style%252520addresses.JPG


After switching to internal addressing:
After%252520changing%252520to%252520B3-style%252520addresses.JPG

Am I missing something?

Thanks,
sb
 
Last edited:
The B3 addresses are yours to do with as you wish. If you want them to be tied to a real push button, then you gotta do that with ladder logic. Alternatively (and I thought this is where you are headed) assign them to a scada or hmi object.

So you need something to stick a "1" in that B3 bit-box in order for it to turn green on your screen. You must control the contents of those non-I/O addresses. The PLC controls the contents of the "I" addresses with input hardware which it scans very frequently, and when in RUN mode it controls the contents of the "O" addresses but only if they are used somewhere in the logic being scanned.

Something like this could work inserted above your seal in rung if you still want to use real pushbuttons to operate internal (user) memory address (not in the Input or Output data tables).

Code:
I:0/1      B3:0/01
--] [--------(   )---

But before you use the above code, right click on the B3 address and click "Go to data table". The value will be highlighted in the matrix. Type "1" and hit enter. If it stays green, then nothing else is writing to it at that moment. Move the child window away from the logic and you should see your "contact" assigned to that address turn green.

Likewise for your Output coil (which is an internal address)...your program is writing to it however, so you can change it from a data table, and the PLC will promptly over write it with the solution on your running rung.

Question: How does that bit address (B3:0/0) relate to the real input (I:0/0) for the stop button?

Answer: It doesn't unless you tell it to.

Extra Credit: Never label a PLC controlled input simply "E-stop" or "Emergency Stop" if it is a non safety PLC input and nothing more. "E-Stop PB1 Monitor" or "E-Stop Button Aux." makes it acceptable if you are using a PLC input to monitor an isolated input from a hard wired safety circuit. This is just my opinion, but is probably shared by others. E-Stops are to be respected as "control reliable". PLCs without a safety rating are to never, never be given that level of respect...not even in comments IMHO.

I hope I am understanding your missing "something" correctly.

Paul

EDIT: Okay, I think I am done fixing all my boo-boos now, so read it again please...
 
Last edited:
OMGoodness, you are for sure addicted now.

That's because this is extremely addictive! I love working on this stuff! To the point, that I have a hard time enjoying going to the movies, for example, because while we're there, all I think about is what I'm going to be doing next with the PLC... This is a good thing since I have chosen it as my new career!

Good times!
 
I hope I am understanding your missing "something" correctly.

Paul, thank you for all the tips. I'm still in the infancy phase learning ladder logic, so will need additional time to apply what you suggested.

The good news is that the PV C600 is now able to set the B3:0/1 bit in the very simple ladder logic below and turn the output ON. So next, I will experiment with what you suggested.

Code:
B3:0/1      O:0/4
--] [--------(   )---

sb
 
Hi Paul,

I was sidetracked from my project and was not able to work on it until now. But I now see what you mean by having a physical contact update an internal address bit (shown below).

Physical%252520Stop%252520Button%252520with%252520Internal%252520B3-stype%252520addresses.jpg


I still have to learn more about how to reset multiple B3 addresses and a ton more things, but it's looking good so far!

Now, regarding your comments about the "emergency" stop button, I'm still not sure I completely understand what you mean. Are you saying is not used because of the type of PLC I'm using? Or is it a general comment about how an emergency button should not be wired as an input only, but instead be hard-wired directly to L1 as well?

Thanks!!!
sb
 

Similar Topics

I am using a Data Station Plus with Crimson 3.0 and connecting to a AB Micrologix 1400 PLC via Ethernet. The issue I am having happens randomly...
Replies
3
Views
4,163
Dear All , we have two CLX hardware that needs to be communicated using 9300 RADKIT modem . The Processor is L61 and firm ware version is 16. We...
Replies
0
Views
1,359
Hello All. I am new to the forum, I am not sure if this has ben addressed or not. I have a Micro820 controller that I am using for a controller on...
Replies
2
Views
626
Hi all, I use a "Remote access from Internet" device on my machine networks, to allow remote access to them, and therefore to the PLCs for remote...
Replies
9
Views
2,710
Hi folks, I'm new to this forum, learning my way around. Please bear with me. At my company, a contractor is wrapping up a project where multiple...
Replies
4
Views
2,021
Back
Top Bottom