You are using an out of date browser. It may not display this or other websites correctly.
You should upgrade or use an alternative browser.
You should upgrade or use an alternative browser.
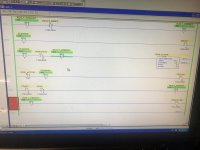
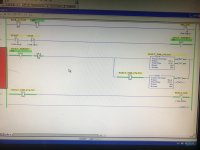
Comments please - my first ever ladder logic program
- Thread starter PLC_SLC500
- Start date
PLC_SLC500
Member
OP
PLC_SLC500
Member
OP
OkiePC
Lifetime Supporting Member
Tips and tricks:
1. For images for the forum: Use your keyboard Print Screen feature to take a snapshot of the screen rather than using a camera phone to grab screenshots. When you do that, the windows clipboard will contain the image and it can be pasted into your favorite bitmap editor where you can edit and save it. My favorite bitmap editor is still Paint.Net after all these years. It's got some of the power of photoshop, but so much easier to learn. Resizing the window BEFORE you capture and sometimes resizing the image in the editor can be helpful to make the posted image easier to view.
2. For sharing files on the forum: If you save your RSLogix file and then create a compressed folder (zip file) and copy the RSLogix file into that folder, you can upload it to the forum. Many members will have the most common PLC software so sharing the actual source code this way can be a lot easier for us to view your code than it will be to look at bitmap images.
3. Address comments. Comment each real world input and output with a name that describes the device. For inputs, describe the true state, for example, if it is a "Low Pressure Switch" that is open when the pressure is low, describe it as "Low Pressure Switch Okay" or "Low PSI (N.C.)" or "Not Low Pressure".
I haven't studied the pictures much yet, those just my 1st impressions. Before I could do that, it would help to know the intended purpose of the system. What do you want it to do now? What will you want it to do in the future?
Last edited:
drbitboy
Lifetime Supporting Member
Rung 0000, [XIO STOP] branch is superfluous with Rung 0001.
Rungs 0007-0008, flasher,:
1. Ote on 0008 could be on a new branch around t4:2 on 0007.
2. Better yet, replace both rungs with 1 rung: xic fault xic s:4/12 ote light, 3 instructions, no timers
Rungs 0007-0008, flasher,:
1. Ote on 0008 could be on a new branch around t4:2 on 0007.
2. Better yet, replace both rungs with 1 rung: xic fault xic s:4/12 ote light, 3 instructions, no timers
Last edited:
GaryS
Member
I would et the flasher just run as a free running flshed that way you can use it other places
on Ring 2 yo have a fault reast to reset when the input tuns off. if the input is lost the faults would be eset. I like to see rests require a positive action to reset
Dos the program work, dos it do what you need if so then you are good to go.
Congrats take what you learned and apply it to your next progam
drbitboy
Lifetime Supporting Member
Rung 0002, the first instruction [XIC FAULT_PRESENT] may be removed without changing any behavior of the program, but it does not hurt anything for it to be there.
drbitboy
Lifetime Supporting Member
Rungs 0000:0001 can be replaced by a single rung like this:
The various booleans/bits are inconsistently named with respect to their values. E.g.
- [BST XIC START XIO FAULT_PRESENT NXB XIC STARTED BND XIC STOP OTE STARTED]
The various booleans/bits are inconsistently named with respect to their values. E.g.
- [START I:1/9] will start the process when the value of [START I:1/9] is 1
- [STARTED B3:0/0] indicates the process is in the started state when the value of [STARTED B3:0/0] is 1
- But [STOP I:1/5] will stop the process when the value of [STOP I:1/5] is 0
- [FAULT_RESET I:1/3] will assign 0 to (i.e. "reset") FAULT_PRESENT when the value of [FAULT_RESET I:1/3] is 0
- Press and release [FAULT_RESET II:1/3]
- Press and release [START I:1/9]
- Wait for [FUNCTION I:1/13] to have a 1-to-0 transition
- Press and release [STOP I:1/5]
- Wait 1s
- Press and release [START I:1/9]
- [YELLOW O:2/12] will be 1 for about four seconds; is that as expected and/or desired?
Tips and tricks:
1. For images for the forum: Use your keyboard Print Screen feature to take a snapshot of the screen rather than using a camera phone to grab screenshots. When you do that, the windows clipboard will contain the image and it can be pasted into your favorite bitmap editor where you can edit and save it. My favorite bitmap editor is still Paint.Net after all these years. It's got some of the power of photoshop, but so much easier to learn. Resizing the window BEFORE you capture and sometimes resizing the image in the editor can be helpful to make the posted image easier to view.
"Snipping tool" works quite well and there should not be a need to edit or resize but it can be if the need arise.
drbitboy
Lifetime Supporting Member
I see five functions that this program will perform
General comments
- Start/Stop function: Rungs 0000:0001
- Inputs
- [START I:1/9] momentary(?) button(?); normally 0; active when 1 => Start command
- [STOP I:1/5] momentary(?) button(?); normally 1; active when 0 => Stop command
- [FAULT_PRESENT B3:0/1] internal boolean; normally 0; active when 1 -> A fault is present and has not been cleared
- Output
- [STARTED B3:0/0] internal boolean; normally 0; active when 1 => Some part of the process has started
- Logic
- STARTED becomes active = 1 via Latch (OTL) when START is active = 1 and FAULT_PRESENT is inactive = 0
- STARTED becomes inactive = 0 via Unlatch when STOP is active = 0.
- Comment:
- This functions current logic could be replaced, and become more clear, with the Start/Stop pattern
- The only difference would be the behavior across PLC mode changes
- This functions current logic could be replaced, and become more clear, with the Start/Stop pattern
- Inputs
- Fault present function; Rung 0002 and Rung 0006
- Inputs
- [START I:1/9] momentary(?) button(?); normally 0; active when 1 => Start command
- [STOP I:1/5] momentary(?) button(?); normally 1; active when 0 => Stop command
- [FAULT_RESET I:1/3] normally 1; active when 0 => clear fault
- Outputs
- [FAULT_PRESENT B3:0/1] internal boolean; normally 0; active when 1 => A fault is present and has not been cleared
- Logic
- FAULT_PRESENT becomes active = 1 via Latch (OTL) on Rung 0006 when START is active = 1 and STOP is active = 0 on the same scan
- FAULT_PRESENT becomes inactive = 0 via Unlatch (OTU) on Rung 0002 when FAULT_RESET becomes active = 0
- N.B. this could be overridden later in the same scan on Rung 0006
- Comment
- This function's current logic could be replaced, and become more clear, with the State/Fault pattern
- Inputs
- Control a white light(?); Rung 0003
- Inputs
- [STARTED B3:0/0] internal boolean; normally 0; active when 1 => Some part of the process has started
- Outputs
- [WHITE O:2/0] normally 0; active when 1
- Logic
- WHITE output becomes 1 when STARTED is 1
- Presumably this turns on a white lite to indicate some part of the process is in a started state
- Comment
- Discrete output [WHITE O:2/0] could have its value assigned via an OTE in a branch in parallel with the OTE [STARTED B3:0/0] of the Start/Stop pattern proposed above, eliminating this Rung
- Inputs
- Control a yellow light(?), Rungs 0004:0005
- Inputs
- [STARTED B3:0/0] internal boolean; normally 0; active when 1 => Some part of the process has started
- [FUNCTION O:1/15] normally 0; active when 1; the name of this discrete input is generic so nothing is know about it, or why it would be in any state
- [FAULT_PRESENT B3:0/1] internal boolean; normally 0; active when 1 -> A fault is present and has not been cleared
- [RIDE_ACTIVE T4:0] TOF timer; specifically T4:0/DN; normally 0; active = 1
- Outputs
- [YELLOW O:2/12] normally 0; active when 1
- Logic
- Output YELLOW follows T4:0/DN; when it becomes 1, it presumably turns on a yellow light
- T4:0/DN is 1 when the STARTED and FUNCTION both are active = 1 while the FAULT_PRESENT is inactive = 0.
- T4:0/DN also extends by 5s the duration that it is active = 1 after any of the STARTED, FUNCTION or FAULT_PRESENT bits change state.
- Comment
- None
- Inputs
- Flasher when faulted; Rungs 0007:0008
- Inputs
- [FAULT_PRESENT B3:0/1] internal boolean; normally 0; active when 1 -> A fault is present and has not been cleared
- [FAULT_TMR_STATUS T4:1] specifically T4:1/DN
- [T4:2] specifically T4:2/DN
- Outputs
- [FAULT_LED O:2/6] presumably an LED
- Logic
- When FAULT_PRESENT is active = 1, FAULT_LED alternates between 0 and 1 at 1Hz on a 50% duty cycle.
- Comment
- There are simpler, cleaner ways to do this, as mentioned earlier by both @GaryS and myself.
- Inputs
General comments
- Each function deduced above can be handled by a single rung, often by using well-known patterns that are instantly understood by others
- latches/unlatches, when used, of any single bit should be paired next to each other and not separated; e.g. the latching and unlatching of FAULT_PRESENT. four rungs apart, is a prelude to future mistakes.
- A comment on each rung, describing the interface with the process and the model the PLC is using for that process would be extremely useful, e.g. especially three months from now when OP, or someone else, is trying to diagnose a problem.
Last edited:
PLC_SLC500
Member
OP
Tips and tricks:
1. For images for the forum: Use your keyboard Print Screen feature to take a snapshot of the screen rather than using a camera phone to grab screenshots. When you do that, the windows clipboard will contain the image and it can be pasted into your favorite bitmap editor where you can edit and save it. My favorite bitmap editor is still Paint.Net after all these years. It's got some of the power of photoshop, but so much easier to learn. Resizing the window BEFORE you capture and sometimes resizing the image in the editor can be helpful to make the posted image easier to view.
2. For sharing files on the forum: If you save your RSLogix file and then create a compressed folder (zip file) and copy the RSLogix file into that folder, you can upload it to the forum. Many members will have the most common PLC software so sharing the actual source code this way can be a lot easier for us to view your code than it will be to look at bitmap images.
3. Address comments. Comment each real world input and output with a name that describes the device. For inputs, describe the true state, for example, if it is a "Low Pressure Switch" that is open when the pressure is low, describe it as "Low Pressure Switch Okay" or "Low PSI (N.C.)" or "Not Low Pressure".
I haven't studied the pictures much yet, those just my 1st impressions. Before I could do that, it would help to know the intended purpose of the system. What do you want it to do now? What will you want it to do in the future?
1 - agreed - This is a FULLY isolated WinXP Machine (no network or file share access) unable to do so (intentionally) otherwise i would.
2 - please see 1
3 - perfect thankyou
PLC_SLC500
Member
OP
Rung 0000, [XIO STOP] branch is superfluous with Rung 0001.
Rungs 0007-0008, flasher,:
1. Ote on 0008 could be on a new branch around t4:2 on 0007.
2. Better yet, replace both rungs with 1 rung: xic fault xic s:4/12 ote light, 3 instructions, no timers
nice one. Thankyou
PLC_SLC500
Member
OP
I would et the flasher just run as a free running flshed that way you can use it other places
on Ring 2 yo have a fault reast to reset when the input tuns off. if the input is lost the faults would be eset. I like to see rests require a positive action to reset
Dos the program work, dos it do what you need if so then you are good to go.
Congrats take what you learned and apply it to your next progam
great feedback. Thankyou
yes the programs work correctly
PLC_SLC500
Member
OP
Rung 0002, the first instruction [XIC FAULT_PRESENT] may be removed without changing any behavior of the program, but it does not hurt anything for it to be there.
cheers
PLC_SLC500
Member
OP
Rungs 0000:0001 can be replaced by a single rung like this:
(i.e. the Start/Stop pattern; see here) with no change in functionality, other than for a PLC Run mode switch.
- [BST XIC START XIO FAULT_PRESENT NXB XIC STARTED BND XIC STOP OTE STARTED]
The various booleans/bits are inconsistently named with respect to their values. E.g.
General comment: it is not at all clear what the code is trying to do. Even so, I suspect Rungs 0004:0005 may exhibit unexpected behavior e.g.
- [START I:1/9] will start the process when the value of [START I:1/9] is 1
- [STARTED B3:0/0] indicates the process is in the started state when the value of [STARTED B3:0/0] is 1
- But [STOP I:1/5] will stop the process when the value of [STOP I:1/5] is 0
- [FAULT_RESET I:1/3] will assign 0 to (i.e. "reset") FAULT_PRESENT when the value of [FAULT_RESET I:1/3] is 0
- Press and release [FAULT_RESET II:1/3]
- Press and release [START I:1/9]
- Wait for [FUNCTION I:1/13] to have a 1-to-0 transition
- Press and release [STOP I:1/5]
- Wait 1s
- Press and release [START I:1/9]
- [YELLOW O:2/12] will be 1 for about four seconds; is that as expected and/or desired?
comments noted. Thankyou
Similar Topics
Hey guys,
I recently visited an existing water plant that's running a Scadapack32 with ClearScada for the HMI. I've been looking through the...
- Replies
- 0
- Views
- 1,467
Hi..
I've just completed the Silo simulation exercise 3. I know it has alot of rungs because my initial idea is to activate output by using...
- Replies
- 0
- Views
- 3,561
Hello again,
Still working on my tank mixing project between breakdowns and maintenance!
It would be really helpfull if any of you fancy...
- Replies
- 7
- Views
- 2,699
I'm pretty new at this. I've attached a PDF file. Open the file and take a look at my little program. I wanted to
turn "OUPUT O:2/10" ON for a...
- Replies
- 3
- Views
- 1,854
It better to have too many instead of not enough right?
- Replies
- 26
- Views
- 2,856


