Looping a Program in Xinje PLC

@drbitboyNow I am a bit struggling to insert it inside of the main program.

This is why SET/RST and spaghetti code can be a less-than-best practice: you don't really know how or why the code works without the homing step, so it is difficult to insert a new step (to home the linear guide); even if you do figure it out where to put it, then it will be difficult to modify the working code without breaking it.

With @parky's approach (if step value is 0 and the conditions for step 0 completion are True, then assign 10 to step), you could have
  • inserted a new homing step, step 5, between steps 0 and 10 to home the linear guide
    • step 5 transitions to step 10 when the linear guide is at home
  • made step 0 transition to step 5 instead of step 10
and you would be done.

Now that you have the SET/RST/Spaghetti thing working and you have learned the lesson to not do it that way, the best thing to do is to refactor: start over using either @parky's step approach, or the Step pattern. You will be amazed how much simpler the code will be.

We solved a spaghetti problem once (and spent a day examining and labeling your code to make it more understandable). It was a puzzle and that was fun, but, hard as it is to believe, I have a life apart from PLCtalk 🤪, I am not going to do that again.

If you are determined to stay with the SET/RST/Spaghetti approach, then
  1. Add comments what each rung is doing (describe the process e.g. "Delay start of cylinder extening" not "Run cylinder delay timer"),
  2. Label every bit, especially the intermediate M bits,
  3. Consider re-ordering the rungs so each bit's SET and RST are closer to each other, and
  4. you're on your own.
That way, you might at least be able to more fully understand what the program is doing.

Good luck.
 
Here is an approach similar to the Step pattern from that Patterns website.

I still think @parky's integer step is the better approach, but I will leave that to him, if he cares to do it.

But the key point I am making here is "separation of concerns:"
  • One routine. STATE_EVAL, handles the step logic, which is the more complex part of this process.
    • However, by using the same canonical PLC pattern over and over, the logic is made more clear and easy to follow. No spaghetti!
  • The other routine handles the actions i.e. when to rung the pulse generator, when to activate the reverse output
    • This is simple and should be easy to understand,
    • but the main benefit is that these actions are removed from the step logic, which makes the step logic easier to follow.
I did this for a MicroLogix, and the details are different (e.g. how the PULSR equivalent would be coded - not shown here), but the principles will port to the Xinje environment.
 

Attachments

  • garment_cutting_sequence.pdf
    209.5 KB · Views: 3
Here is an approach similar to the Step pattern from that Patterns website. [...]
Whoopsie, there was (at least) one typo in that PDF in the previous post: in the LAD 3 STATE_EVAL routine, Rung 0000, the M8002 (First Pass) bit should be examined with a -]/[- Normally Closed contact, not -] [- Normally open.
 

Attachments

  • garment_cutting_sequence_2.pdf
    209.2 KB · Views: 6
First of all, some of the instructions for the motor ******* seem to be different in the mitsi for example there is no STOP function.
I do not understand why you are using the STL that in reality is just a flow, I never use them It is not strictly a loop as the program is cyclic so the whole progam loops just jumps or logic determine what segments of ladder are processed. I use an integer variable to run each step for example assume I have a variable called Seq_Number (D20), then create my flowchart
So lets assume I have a sequence as follows:
Seq. 0 = IDLE
Seq. 10 = Start pressed waiting for part
Seq. 20 = Part Detected, clamp Part
Seq. 30 = Clamp Cl,amped step on to move motor
Seq. 40 = Move motor FWD
Seq. 50 = Motor at position, Stop motor
Seq. 60 = Stamp part
Seq. 70 = Return motor
Seq. 80 = Unclamp
Seq. 90 = Unclamped, move 10 into Seq.
Note: I use steps of 10, this means if I need a few extra steps it is easy to add them i.e. insert an extra one at 25 without having to move the following ones about.
As a quick demonstration here is a simple 2 way traffic light system using a sequjence, it just uses timers but a machine would use sensors & timers for it's current state to move onto the next state.
also I suggest you use a little more documentation i.e. symbols for those memory bits & ladder comments it will make it easier to understand by others & if you re-visit in a few years time.
@parky Hi, sorry but I don't know how to get integers or sequences in Xinje PLC program. I don't even know if they are available in Xinje, in the first place. I've roughly gone through there lengthy manual, but did not find anything related either.
 
@parky Hi, sorry but I don't know how to get integers or sequences in Xinje PLC program. I don't even know if they are available in Xinje, in the first place. I've roughly gone through there lengthy manual, but did not find anything related either.
Hi, @drbitboy,

What is the programming tool you are using here ? I looks as if its very simple (though I still do not understand most of it, maybe because this is my very first PLC code for an industrial application) Xinje looks so complex.

Tbh I really don't understand yours and @parky's concepts on 'integer', 'sequence' 'state', 'eval', 'no sphagetti', 'refactor', 'step', 'pattern', 'JSR' and how to convert my program to look like yours. I don't see these things anywhere in the Xinje manual nor its programming software.

Thank you for trying to help.
 
[Part 1 of 2:]

What is the programming tool you are using here ?
It is the IDE for an Allen-Bradely software program called RSLogix Micro Starter Lite, and it is used to program MicroLogix PLCs, but I suspect is similar to the IDE you have for programming the Xinje, and most of the instructions demonstrated in that RSLogix IDE will have equivalents in the Xinje IDE.

I looks as if its very simple (though I still do not understand most of it, maybe because this is my very first PLC code for an industrial application) Xinje looks so complex.
Every set of tools looks complex when you start. The only way to learn is to look at each individual tool (instructions) and learn how it works and what it is capable of doing. For example, the -| |- Normally Open Contact and the -|↑|- Rising Edge Pulse instructions are similar in some ways but have different behaviours, dependent on the values of their input rungs and operands (the operand is the bit, e.g. M0 or T1, above the instruction).

Tbh I really don't understand yours and @parky's concepts on 'integer', 'sequence' 'state', 'eval', 'no sphagetti', 'refactor', 'step', 'pattern', 'JSR'
The PLC program is a model of the process (the process is the cylinders, switches, sensors, etc.). Any PLC program maintains its model of the process by reading and examining the values from the PLC inputs, and controls the process by manipulating the PLC outputs (forward and reverse, extend and retract cylinders, send pulses to the motor, etc.). One common name for such a model in the PLC is "state machine."

Xinje calls integers "words" - you are loading integer values into word registers (D10, D11, D20) in the first rung of your main program.

"Sequence" means you want the process to perform several unique operations over time and in a certain order i.e. in a certain sequence. For example, based on @parky's earlier post:
Code:
State 0 = Initial step or Reverse Pulses completed; IDLE
State 20 = Start pressed; wait for a Garment to be detected.
State 30 = Garment Detected; delay before holding garment
State 40 = Delay completed; extend cyclinders, and wait for cylinder sensor to indicate garment is held
State 50 = Garment held; move guide motor forward (send pulses) and cut material, wait for pulses to complete
State 60 = Forward Pulses completed; stop motor and cutting, delay before reversing and unclamping
State 70 = Delay completed; reverse guide mode and release garment (retract cylinders), wait for pulses to complete (return to 0)

"State" and "step" mean the same thing: the state of the PLC model during one of those sequenced unique operations. The division of the process into a sequence of unique operations (states) is somewhat arbitrary, but the important point and constraint is that the can be in only one state at any given time. It is convenient to a designate an integer value (Xinje "word") as the "state" or "step" of each unique operation (see state numbers above), and to put one of those values into a "STATE" or "STEP" register e.g. D200. Since we know that that register can have only one state value at the start of any PLC scan cycle, this PLC model satisifies the "one state at any given time*" constraint above.

* note that "PLC scan cycle" is synonymous with "time." PLC programming is primarily about time, and the scan cycle is the clock. When something happens is more important than what happens.

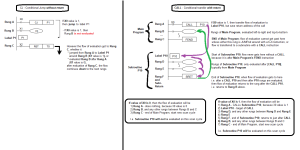
"Eval," as in "STATE_EVAL," means evaluating what State (Step) the PLC model should be "in" (i.e. what is the value of the STATE variable D200) during each scan cycle; this may mean leaving the state at is current value (e.g. waiting for a timer to expire), or transitioning to the next state (e.g. triggering the limit switch that indicates the cylinders are extended and are holding the garment). The blue transition conditions above define the transitions from state to state. For a simple machine, the completion of each step's transition condition causes the STATE register value advance to the next state (0 → 10 → 20 → ... → 70 → 0, etc.).

Spaghetti is the italian word for noodles:

1-126.jpg

"Spaghetti" in the context of programming is a nickname for "spaghetti code," where a program's logic flow is convoluted and difficult to follow.

"No spaghetti" describes how you want the program to look, because you will spend a lot more time reading code than you will spend 
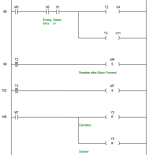
writing code, and having the program be as clear as possible makes it easier to read. Let's look at your code for a moment:

01.png

Let's say we were interested in how the Motor Direction is set up to be in reverse. We know that the Motor Direction is controlled by output Y6, and so we find the rung @112, the bottom rung in that image, and that the value of Y6 is SET to 1 on that rung. We look to the left and see the condition(s) that cause the SET instruction to write a value of 1 to Y6, and we see that the only condition is a rising edge of bit M4. So now we search for the rung that assigns the value M4, and we have to follow the blue line, like a tangled noodle or a piece of tangled spaghetti, across two other unrelated rungs (@106 and @102), before we get to the rung @98, and we see that M4 may have a rising edge when the T2 timer expires. And then another piece of tangled spaghetti finally gets us to the rung @86, where we see an unlabelled bit, M3, controlling the T2 timer.

From this example, I hope you now know what I mean by "spaghetti" (or "spaghetti code"). And not to put too fine a point on it, but this example is the reason it took so long for anyone, including yourself, to understand your code well enough to know why the motor was not reversing on the second cycle.

I want you to try an experiment in Rubber Duck Debugging (see here): please explain to yourself (or your "rubber duck," if you have one ;)), why the M4 bit exists in this program; that is. provide the rationale why you have the T2 expiry bit going though the M4 bit to get to the Y6 output bit. I'll bet you can't even convince yourself of a good reason. Would it not be better to do it much more simply, like this:

02.png

where you can see immediately, in one rung with no spaghetti, where the Motor Direction is set. I know some programmers will say that that should be two, or even three or four rungs, and that each rung should do one thing, and I don't disagree with that. But certainly those M4 (and M7) intermediate bits are completely unnecessary.

"Refactoring" is taking a program that is hard to read and understand, but works, like yours, and changing the organization, data structures, logic, etc. as needed so that the program behaves exactly the same way it did before, with the same interfaces (inputs and outputs), but is now a better program. Better might mean "more efficient," or "more flexible," or "easier to read and understand and debug."
 

Attachments

  • 01.png
    01.png
    11.1 KB · Views: 2
[Part 2 of 2:]

Note that each of those states (steps) above has two sections:
  • a transition condition, and
  • actions to perform.
If you look at my program, it has two routines (or sections): the STATE_EVAL routine evaluates each states transition condition; the ACTIONS routine evaluates the actions to perform. Each routine is evaluated once per scan cycle. The point is that, once you have a "state machine," those two sections can operate independently. And as a result, my code is easier to read and understand and debug. Your old code implements a state machine, but the transition conditions are mixed in with the actions to perform, resulting in spaghetti code that is hard to read and understand.

Again, not to put too fine a point on it, but consider your latest request about inserting ensuring the linear guide is homed before starting the pre-extend-cylinders delay: you had no idea how to do it; I refused to do it and instead quickly wrote an entire replacement program that was easier to understand.

Now look at the State (State 0 = ...; State 20 = ...; etc.) list from earlier in this post: you can see exactly where to insert the "Ensure guide is homed" state; and because the logic looks like that list, it will be simple to insert that new homing state's logic into the STATE_EVAL section and into the ACTIONS section of the program. Note that this is one one the reasons @parky said to number the steps in increments of 10 or more: it makes it easier to insert new steps as new capabilities are required.

and how to convert my program to look like yours. I don't see these things anywhere in the Xinje manual nor its programming software.

Certainly the Xinje has equivalent basic instructions (contacts, coils, etc.), so the Xinje code could be refactored into one main program without subroutines, but with two well-commented sections.

I think the Xinje also has the CALL and SRET (return) instructions to implement behavior similar to the RSLogix JSR (Jump to SubRoutine) instruction, if you want to break it into subroutines.
 
Last edited:
[Part 2 of 2:]

Note that each of those states (steps) above has two sections:
  • a transition condition, and
  • actions to perform.
If you look at my program, it has two routines (or sections): the STATE_EVAL routine evaluates each states transition condition; the ACTIONS routine evaluates the actions to perform. Each routine is evaluated once per scan cycle. The point is that, once you have a "state machine," those two sections can operate independently. And as a result, my code is easier to read and understand and debug. Your old code implements a state machine, but the transition conditions are mixed in with the actions to perform, resulting in spaghetti code that is hard to read and understand.

Again, not to put too fine a point on it, but consider your latest request about inserting ensuring the linear guide is homed before starting the pre-extend-cylinders delay: you had no idea how to do it; I refused to do it and instead quickly wrote an entire replacement program that was easier to understand.

Now look at the State (State 0 = ...; State 20 = ...; etc.) list from earlier in this post: you can see exactly where to insert the "Ensure guide is homed" state; and because the logic looks like that list, it will be simple to insert that new homing state's logic into the STATE_EVAL section and into the ACTIONS section of the program. Note that this is one one the reasons @parky said to number the steps in increments of 10 or more: it makes it easier to insert new steps as new capabilities are required.


Certainly the Xinje has equivalent basic instructions (contacts, coils, etc.), so the Xinje code could be refactored into one main program without subroutines, but with two well-commented sections.

I think the Xinje also has the CALL and SRET (return) instructions to implement behavior similar to the RSLogix JSR (Jump to SubRoutine) instruction, if you want to break it into subroutines.
@drbitboy Thank You Very Much for Your Length Explanations. It's very kind of you. Really appreciate it...

I tried your approach but I don't think it is doable in Xinje. Mainly because it only has memory bits. It does not have an address system like B3:0/0 etc. I have attached a screenshot of what it looks like but I don't know how to match it with Xinje. I've gone through the manual.

1712015703787.png

Thereafter, due to my tight deadlines I continued with my program in the usual way. I was able to introduce a homing program P1 (which runs successfully when it is in a separate file) to the main program, but when I put that program in to the main program, only that program runs but the main program doesn't. I have attached a pdf of that here too. I am suspecting I may have used 'END', 'FEND' instructions wrongly with the conditional jump I have used. I don't know if I have to use 'CALL' function either. And I am not sure if I have used M8002 in the right place to start the program.

In P1, when X3 and X4 sensors are activated the Y2 cylinder comes down and the motor goes back to home position, carrying the guide and the scissor attached to it. When homed (X2 sensor triggers), the cylinder retracts. My requirement is to start the main program after this. Sorry for asking too much...
 

Attachments

  • Scissor Main Program with P1 Sub Program to Home.pdf
    117.5 KB · Views: 3
@drbitboy Thank You Very Much for Your Length Explanations. It's very kind of you. Really appreciate it...

I tried your approach but I don't think it is doable in Xinje. Mainly because it only has memory bits. It does not have an address system like B3:0/0 etc. I have attached a screenshot of what it looks like but I don't know how to match it with Xinje. I've gone through the manual.

The difference in the syntax to address memory is not really relevant: a memory bit is a memory bit, and a memory bit can only have a value of 0 or 1 as read by a contact, can only have a value of 0 or 1 written to it.

You could use M1 for my B3:0/0, M2 for my B3:0/1, etc., and the program would be essentially the same. The biggest difference is that my code does not write bit values with the SET/RST bit instructions, but makes the latches explicit with seal-in branches (see here) and writes bit values with coils. Also the timer instructions are slightly different, but it should be straightforward to port to the Xinje since you already have timers in your program.

As far as integrating that Homing logic into your existing main program, I can only say I again wish you Good Providence and yes you are asking too much, because figuring out where to insert the homing logic into that rat's nest of spaghetti will take more patience than I am willing to give.
@drbitboy Noted. Thanks for staying with me for this long. Have a great day !
 
Subroutines i.e. call other programs there is a procedure you have to follow, for example you start with a standard program wgere you have an END instruction, at the end of your main program insert a FEND instruction then put the subroutines after this with SRET instruction for each subroutine the END function must be after these subroutines.
 

Attachments

  • Subroutines.png
    Subroutines.png
    64.2 KB · Views: 5
@drbitboy Noted. Thanks for staying with me for this long. Have a great day !
PLCs evaluate the user program left-to-right then top-to-bottom.

So the program you have written, with
Code:
 M8002   M500
-|↑|-----(S)---

 X2
-| |------[CJ P1]--

--[FEND]----

[P1]
...
[SRET]

at the top will never evaluate any rungs after the [SRET] if X2's value is 1, or after the [FEND] if X2's value is 0.

The [FEND] and [END] instructions are essentially the same thing; the [SRET] (after a [P1] or [P2] or [P2] etc.) is probably the same as [END] if the evaluation flow gets there as part of the main program, but it includes the ability to return to the address from which its routine (e.g. [P1]) was originally called with the [CALL] (not CJ) instruction. So you should move the FEND and the [P1]...[SRED] to the end, i.e. after the Main Program.

See the attached image also.
 

Attachments

  • Untitled.png
    Untitled.png
    75.6 KB · Views: 3
you need the END instruction after the subroutines or it will not compile as per the pic I have shown, not sure about your IDE but not obvious how to put the pointer in the left hand box, a quick way in Mitsi is to add it as a rung comment then edit it to take out the"," in the text it converts it to the pointer.
 
Subroutines i.e. call other programs there is a procedure you have to follow, for example you start with a standard program wgere you have an END instruction, at the end of your main program insert a FEND instruction then put the subroutines after this with SRET instruction for each subroutine the END function must be after these subroutines.
Noted with thanks. Will check it out and let you know of the outcome.
 
PLCs evaluate the user program left-to-right then top-to-bottom.

So the program you have written, with
Code:
 M8002   M500
-|↑|-----(S)---

 X2
-| |------[CJ P1]--

--[FEND]----

[P1]
...
[SRET]

at the top will never evaluate any rungs after the [SRET] if X2's value is 1, or after the [FEND] if X2's value is 0.

The [FEND] and [END] instructions are essentially the same thing; the [SRET] (after a [P1] or [P2] or [P2] etc.) is probably the same as [END] if the evaluation flow gets there as part of the main program, but it includes the ability to return to the address from which its routine (e.g. [P1]) was originally called with the [CALL] (not CJ) instruction. So you should move the FEND and the [P1]...[SRED] to the end, i.e. after the Main Program.

See the attached image also.
Thanks a lot. Will apply and let you know what happened. Tomorrow I am not having the machine to work with as I am WFH, hopefully by day after tomorrow.
 

Similar Topics

hi people, i m new to Siemens S7 300 PLC. i wrote a ladder traffic light programme with just three LED's. my program runs well for all LED's but...
Replies
1
Views
1,825
Hi.. I would like to seek your help in one PLC program. I am currently doing a pick and place PLC program using FPWIN GR program. Everything...
Replies
2
Views
3,613
Looping program All, Any help here is appreciated.... Trying to use a AB Micrologic 1000 to simulate inputs to another machine to dry run it...
Replies
2
Views
1,732
Hello, I am programming a ladder routine that finds a part on a conveyor that has a given part number. I am having no problem finding the part and...
Replies
1
Views
1,908
I've got several ListBoxes that I want to perform the same function on. From my searches, you can accomplish this in VBA by using a FOR loop, but...
Replies
4
Views
2,888
Back
Top Bottom