Terminal Block Labling

PLC Pie Guy

Member
Join Date
Jun 2013
Location
Halifax
Posts
1,144
Hey all.

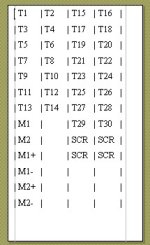
I am looking for ideas on how you folks label your terminal blocks in control panels. Typically I have always labeled the wire on both sides of the terminal and simply not labeling the terminals themselves but since we are now building new panels from scratch rather than simply "turd polishing" older panels I want to label everything. Especially since were building now with the CSA mark!!!!!
The most recent one I did I made tiny "terminal" labels with my wire labeler and stuck them on but I am not happy with them, they look cheesy.
I see a few options out there but most leave me purchasing a printer. Is that what most of you have done? Purchase a printer. Or have you found other creative ways to mark and label.

Thanks for the input
 
Use Wago or Weidmuller terminals and buy the specific labels for them which clip onto the terminals.

I normally number each terminal sequentially and then label the cables themselves.
 
Phoenix Contact has a ton of solutions as well!!

I've used them for close to 10 years now. Alot of options for the terminals. Probably just like Wago or Weidmuller.

We use their Bluemark LED terminal labeler. Can print stack of labels in a very short time and the BlueMark labels don't rub off like printed ones do. It uses liquid plastic instead of ink. Very durable.
 
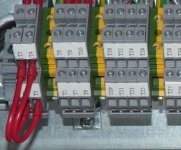
You can spend a long time putting labels on terminals. The quickest way I have found that still looks OK and lasts a long time is to print them out on a Dot Matrix printer on to sticky labels, slice them in to strips, and stick them to a length of terminal markers. This is for the Entrelec/ABB terminal range. I could probably do the same and make them prettier with a thermal label printer, but I was worried that the heat in the box would end up making them go black.

Terminal Labels.jpg Terminal labels 2.jpg Labels on terminals.JPG
 
They should start selling a 100 pack of terminals labelled 1-100. Then you just need a Terminal Group Identifier. Bonus points if these clip off, so if you don't use the last few, you can reuse them elsewhere.
 
I like to label inputs i.e. 1000 to 1063 et al.
And outputs 0000 to 0063 for example.

It is just cool to be able to not have to look at a conversion chart. 1 kind of stands for an I, and 0 kind of stands for an O.

Also, love when the i/o is laminated to the inside of the panel door.

I guess if you had lower density i/o you could modify this to include the slot number.
 
Last edited:
I usually use:
1000 = Digital in [1+#(Slot)+##(Input number)]
2000 = Digital Out
3000 = Analog In
4000 = Analog out

Makes wiring easier to identify by just looking at wire number.....imo

Phoenix labels>vinyl wrap with clear section on end to protect inking.
TB4 and TB6 terminals withe printed markers wiht wire numbers.
 
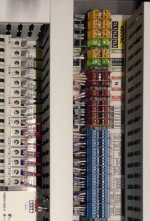
Before my panels are built, a drawing of the back plate with components and labels is made. This drawing is then printed by a sign shop and applied to the back plate. After that the components are mounted and wired. Attached is a picture showing a section of what the final panel looks like and how the terminals are labeled.

TerminalLabelsSmall.jpg
 
Archie,
That looks good!!! It seems so much less tedious then sitting and fumbling with the tiny little identifiers.

That sure does take some good forward planning, a change would be brutal after the fact.

Thanks for all the good ideas. Iv got a lot to go on.
 
We use strips according to designation (X1 = 230 VAC, X4 = safety, X2 = 24 VDC). Terminals themselves are numbered by the page in the drawings they are on (X1-401..402, first two terminals on page 4).
 
Archie,
That looks good!!! It seems so much less tedious then sitting and fumbling with the tiny little identifiers.

That sure does take some good forward planning, a change would be brutal after the fact.
Well planning is very important! The drawback is that it is not forgiving if you do a lot of changes after panels are built. It does take a bit more time up front, but you can make up some of that time during the panel build. Everything is printed to scale, so it is not necessary to measure anything like DIN rail or wire tray for cutting or placement.

To give you an idea of the amount of work is required up front, attached is a picture of the same panel before any components were mounted. This is how it looks directly after coming from the sign printing shop.

IMG_2708CroppedSmall.jpg
 
What software do you use to create the panel layout? Do you then give it to your sign printer as a .jpg, .png, ?? How large of a panel can you do?

Thanks
 
What software do you use to create the panel layout? Do you then give it to your sign printer as a .jpg, .png, ?? How large of a panel can you do?
I use Adobe Illustrator to make the panel layout drawings, which is probably not the easiest. I use that software because I know my way around it the best and I have built up a library of 2D components. I export the drawing to a PDF to send to the sign shop. The PDF maintains the scaling and details needed. A JPG can blur the text. The largest back plate I have done with this technique was a 72"x36"

I have seen some very quick examples of EPlan and SolidWorks panel layout drawings and wondered if those packages were capable and easier for doing panel layouts with labeling.
 

Similar Topics

In the past, we have used AB 1492 feed thru screw terminals a lot. Lead time on these with our distributor is terrible. Is there an almost...
Replies
1
Views
119
Hello everyone, I'm trying to find a DIN mountable terminal block with an LED/indicator light that will light when the block has power. The...
Replies
6
Views
1,374
Does anyone know if the front face of the terminal block can be removed for ease of connecting the wires? I'm referring to the screws circled in...
Replies
7
Views
2,186
I'm having a hard time finding the manufacturer of the terminal blocks shown in the picture below. They're very similar to the AB 1492-CA...
Replies
3
Views
1,604
Which Style to you expect to see on a drawing? Which style to you prefer? Keep in mind this being used on very large projects Style 1 Style 2
Replies
21
Views
6,739
Back
Top Bottom