Anti -Tie Down - Non Repeat - No Timer

I still think it will be tricky to time it with two real push buttons.

A 5/02 is slower than a micrologix or a 5/05, though, so that would help. I could always add a half dozen more rows and columns to count more scans, and there is probably a more compact way of writing it to get the effect. Maybe a 10 scan tolerance for only one button.
 
I think the program should look like this...
the original had a few flaws in it

this is the old relay way of doing it..
Note if the button is tied down or the coil of B3:0/0 or B3:0/1 were forced off the machine could still start in Oki's case - sorry mate.


No Timers or counters needed

PS
if you are worried about B3 0/1 being forced ON - simply put a normally closed contact from both


in series with the light output
Commonly used in Tripple redundant ccts

Capture.GIF
 
Last edited:
I will add that it is customary on Mechanical presses to double up all Clutch Brake Control relays - so you would not use a single 'Light' output.
- Dual control all the way

P.S.
Normally use a safety relay to perform this function
 
Perhaps I am missing something, because Ian's circuit doesn't seem to require both buttons to be pressed simultaneously - press button 1, wedge it and the light still comes on when button 2 is pressed. I guess normally he would use a 2 button safety relay.
I'm still not sure if the purpose of this exercise is to introduce scan order for a real life sim and showing the effects of the order of rung execution (cascading relays upwards) or just looking for an actual simultaneous press as a programming exercise.
 
I still think it will be tricky to time it with two real push buttons.

A 5/02 is slower than a micrologix or a 5/05, though, so that would help. I could always add a half dozen more rows and columns to count more scans, and there is probably a more compact way of writing it to get the effect. Maybe a 10 scan tolerance for only one button.


He didn't say you couldn't use counters. Program a flip/flop to a counter, and count the number of the scans you would like to delay (Divided by two for the flip flop). When the pb is off, reset the counter.

I think that there has been some scope creep in this project, and as such probably strayed far from the original intentions. For instance, as someone who has built controls for presses, I don't think the instructors idea of anti-repeat is the same as mine. At least not without a timer, or feedback of the press cycle.
 
Above is simple ripple circuit. The 1st button is shown with seperate rungs and the second on 1 rung. I think it is easier to understand with seperate rungs for each delay. More rungs can be added to extend the pulse. It works by using the PLC scan time to generate a delay.
As with other contributors to this thread, I will emphasize this should not be used in the real world for machinery control.
Paul
 
Perhaps I am missing something, because Ian's circuit doesn't seem to require both buttons to be pressed simultaneously - press button 1, wedge it and the light still comes on when button 2 is pressed. I guess normally he would use a 2 button safety relay.
I'm still not sure if the purpose of this exercise is to introduce scan order for a real life sim and showing the effects of the order of rung execution (cascading relays upwards) or just looking for an actual simultaneous press as a programming exercise.


Quite right Pal,
As a PLC for a safety application is not permitted. (Except for a safety PLC)

The principle of twin interlocked buttons works fine in single operator applications but fails with more than one person. The Operation of either a 'C' or an 'A' class press, with more than one person generally force the operators to use 'Dummy Plugs' at their station. the first modification of the old machine cct is to remove this function - no choice.

The drawing I posted can allow one button to be 'Wedged Down after starting - Once the start has been issued this is possible - but there is a tie back to the press rotary cams, (More than one Usually 4), which also normally stops the process.
- I Also highlighted to insert two Normally Closed Contacts in the Output cct - That negates that.
- If the button is not released it can not be restarted.
- I could draw an entire mechanical press drawing if we need it - (16 YEARS WITH PRESSES)

The old start buttons (Palm Type) are also mechanically forced.
 
Last edited:
This what you wanted it to look like ??

Grr wish I had my RSlogix software on this comp


Rung 1

((b1[]----- b2[]) or Lock[]) -----Release[/] ---- ()Lock

Rung2
b1[/]-----b2[/]------Release()

Rung3
lock[]-------drill()


Darkzadow had it dead on how the teacher wanted it done. I showed it too him tonight and he said it was correct. there were a couple other ways students got the same solution. he was shocked because he said he now has seen 12 different ways to write this solution and all work the same way.

thanks for every ones help on this it certainly was a learning experience and I am glad I found a nice community that offers help without bashing me for not knowing. and a special thanks to OKIEPC for those videos i watched all of them and i actually understood what professor has been trying to teach us. everything clicked.
 
... and a special thanks to OKIEPC for those videos i watched all of them and i actually understood what professor has been trying to teach us. everything clicked.

Gee, I am glad you followed the link, but the real thanks should be directed toward Ron and Archie for all the work that went into those videos.

And, thanks to you for, coming back to let us know about the outcome
 
Its Ok raydog26
The bashing comes later

lol thanks. at least now i have something to look forward too 🍻

Gee, I am glad you followed the link, but the real thanks should be directed toward Ron and Archie for all the work that went into those videos.

And, thanks to you for, coming back to let us know about the outcome

that is true they made one hell of a video. maybe some day ill be able to afford the course. if i get a job ofc lol
 
Raydog,

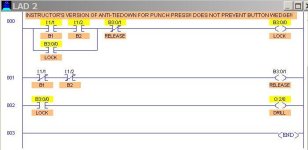
Your instructor had better stick with teaching and not try doing this on a real punch press. He does not have a clue about what is safe! Here is a picture of his version, with Pushbuton B1 pressed first, then 5 seconds later, Button B2 pressed. You can see that the "Drill" runs just fine, even though Bubba has wedged a toothpick into Pushbutton B1! Old Bubba can diddle with his IPod while he operates the drill with one hand. Next year he may be missing an arm....

Now here is a version of Iant's program, showing first that if the buttons are not pressed together, then the "Punch Press" will not start. The third picture shows a simulation of pressing both buttons together and it does start.

The PDF file is a copy of the LogixPro Simulator of the correctly functioning Anti-Tiedown logic, where both pushbuttons must be pressed together or the machine will not start. The ZIP file is the LogixPro program.

ANTI- TIEDOWN- INSTRUCTORS VERSION.jpg ANTI- PB'S NOT PRESSED TOGETHER.jpg ANTI- PB'S PRESSED TOGETHER.jpg
 

Attachments

  • ANTI-TIEDOWN R1.pdf
    187.6 KB · Views: 23
  • ANTI-TIEDOWN R1.zip
    691 bytes · Views: 8
Last edited:
hrm interesting. you explanation makes perfect sense. It did allow me to press 1 button and hold it down then press the other button at any time and the press starts but it would only cycle once until I released both buttons. So really its not an anti tie down its just a non repeat circuit if I understood your explanation correctly.

I am gonna type your program up in RSLOGIX and bring it in and try it out on my PLC. here i just thought I was starting to understand this stuff now im confused again lol. But I am glad you took the time to explain it i truly want to learn the proper methods and understanding.
 
No, no, no. My program will not let you hold down one button and start by pressing the second button. You are thinking that this is the same as Iant's original program (it is not). It will not cycle even one time unless both buttons are pressed exactly at the same time. For that reason, it is impractical in the real-world, but maybe useful to demonstrate the principle. To be practical, some timing routine (such as Paul's) would have to be added to allow a short time range between the first button pushed and the second.

No, you did not understand my explanation correctly. My version truly uses anti-tiedown logic. However, as Iant and others have said, you could not use it on a real press, because it will not meet the safety requirements. Real presses are dangerous machines, and many have lost hands, arms, legs, or their lives.

EDIT: Because the LogixPro Simulator program does not have any provision for pressing two pushbuttons at the same time, I set up the first two rungs of the program as an optional "button presser" routine. If PB3 is enabled and pressed, it causes PB1 and PB2 to be pressed at the exact same time (which is almost impossible for a human operator to do).
 
Last edited:

Similar Topics

Good day all. I have a machine to automate. It is a 2-ton heat press. It moulds small plastic parts. The mould cycle is initiated after the...
Replies
6
Views
3,088
I searched and could not find an answer. The machine is a pneumatic press,two cylinders 32mm bore. Can this machine be built per OSHA safety...
Replies
7
Views
3,741
Can someone show me an example of an anti tie down program? I am using micrologix 1200.
Replies
3
Views
5,734
I am setting up an educational work cell in my University's automation lab. It is a senior thesis project and will be used for educational...
Replies
28
Views
8,684
Is there away to program palm buttons using only one timer in the anti tie down ??
Replies
36
Views
18,326
Back
Top Bottom